If you haven't seen the first to posts in this series, read them first. Day One
here and Day Two
here
So prepare for the photo loaded post, just a reminder, these are the photos the bride took on her cell phone because I lost all mine, so apologies for the weird framing (these were reference pics to help her decide on the design she wanted), under each design, I'll give a quick description of how I did each one.
You will need a batch of dairy free white modelling chocolate, read the day two post for that one, and a batch of royal icing, I used
this one
For the first three designs place a couple if tablespoons of royal icing in a piping bag fitted with a small leaf tip.
For this one, place the wide end of the tip against the cake and make zigzag motions until you reach the top centre of the cake
For this one, again place the wide end of the tip against the cake and slowly pipe vertical lines, allowing the icing to curl as you go up. Finish the raw edges at the top with a horizontal line made in the same way. Finish by flooding the top with some flood consistency icing and top with modelling chocolate calla lilies.
To make the calla lilies, roll some modelling chocolate very thin and out a heart. Roll the heart using the dip between the to bulgy bits as the narrow part of the cone.
Colour a tiny amount of the modelling chocolate yellow and roll into a skinny teardrop shape and attach the wide end of that to the centre of the flower
For this one, again place the wide end against the cake, pipe a zigzag while moving up the cake, again finish the raw edges with a horizontal zigzag and fill with flood consistency icing and top with calla lilies.
For this one, colour some royal icing very dark blue and using a piping bag with no tip, ice around the bottom third of the cake, then, do the same with white icing for the top two-thirds and smooth off with a knife. Again, finish with calla lilies.
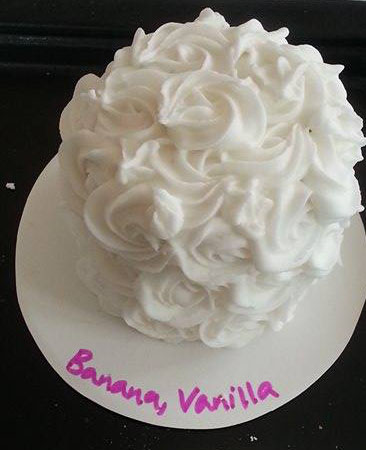
This one is pretty classic, you can find it done all sorts of different ways. Basically, use a medium sized closed star tip and pipe swirls all over the cake.
For this one, cover the cake with white modelling chocolate, then pipe a ring of dots using a number 4 tip (small round). Come down the sides of the cake in a dripping pattern
Cover the cake in white modelling chocolate, roll a small amount of modelling chocolate as thin as possible (I used a pasta maker), cut out two equal sized rectangles, fold them over and pinch the edges so they can stand on their own. Place them seam sides inwards and wrap the seam with a skinnier rectangle with the edges rolled inwards. Cut two longer rectangles with triangles cut out of each end, place these on the cake so they look like they're flowing and add the bow on top. If you're having trouble getting it to stick to itself, use a small amount of melted chocolate.
This one is the same as the above, except wrap the bottom of the cake in a ribbon of modelling chocolate and place the bow you've just made on the bottom.
For this one, cover the cake in modelling chocolate, roll small balls of varying sizes and flatten. Cut thin strips of modelling chocolate in varying widths and wrap around the cake.
Roll strips of modelling chocolate as thin as possible, ruffle slightly and attach with melted chocolate in a wavy line until the sides of the cake are covered. Place a circle of the modelling chocolate over the raw edges of the ruffle and top with a couple of hearts.


No comments:
Post a Comment